A Portable Parabolic Cooker Built from an Umbrella
Juan Francisco Paredes. Email: juanfranciscoparedes@gmail.com

I would like to
relate my experience and describe my solar cooker in order to thank all of
those who have done so previously and have inspired me, and so that anyone else
can learn from my experiences, which have shown that it works: Half a litre of water began to boil in
20-30 minutes and this was on a windy day. My objective was to get results
close to those of commercial parabolic cookers, but in a portable design since
I do not have a terrace or yard with space for a cooker. White rice for 4 people cooked in
approximately one hour - and it was a little overdone!

I learned about
solar cookers two months ago, primarily thanks to
Solar Cookers International, and I put myself to work: I just had to try it! Cook with the sun? And after many attempts and disappointments, I
eventually obtained better results than I had hoped for.
Before making
this model I made a paracocina,but instead of aluminium
foil I used the sunscreens for car windshields for improved strength, but they
were disappointing. Probably this was
because these sunscreens were not good reflectors, in addition to other factors
such as not being able to find an adequate plant stand of the right size and
the fact that the umbrella had ten ribs.
My model is
based on paracocina designed by Marc
Ayats
http://www.cuinessolaar.iespana.es/ and the
Sumbrella
designed by Quinton Stowell
http://www.sunspot.org.uk/
, but with some differences:
Reflector
The most
important and difficult item to find is the umbrella. It should be an umbrella with sixteen ribs of
1 – 1.2 cm in diameter, which are not easy to find as most umbrellas have only 8
or 10 ribs. I located one of these in an
online store at
http://www.bazarfrancia.com/
.
It cost me 15 € with shipping costs.

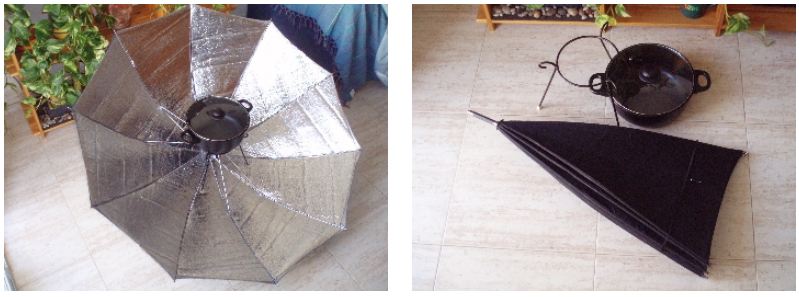
Using the same
procedure as that for the paracocina I cut off the shaft of the umbrella but I don’t
use it for closing; instead I fold it so that it is easier to carry. In order to position the structure I use a
screw that fits into the drilled hole on the shaft. I left a part of the closing strap for
storing it as you can see in the central photo.
In addition, I had to attach a couple of tension cords to stabilize the
cooker in the wind.
As for
reflective material, I thought over various possibilities. I think I found
something ideal but I didn’t use it since I live in the
This material
is used for lighting. A sheet of
2000x1000x0.4m/m weighs about 2.20Kg and costs between 4.85€/Kg. to 5.55€/Kg. The quantity
needed depends on the size of the umbrella used.
Apart from this, I went back and forth between various possibilities because aluminium foil has the disadvantages of wrinkling easily, and it won’t stand up to all the repeated opening and closing of the umbrella. In my opinion, the more polished, shiny and mirror-like a material is the better. I came across various: aluminium tape that is used for heating systems, aluminized cardboard, and adhesive plastic that can be easily found in fabric or stationary stores, which is what I finally used.

The stand and grill
I used a
compact camera tripod because I was not able to find a plant stand of the right
size, though I know they do exist. With
this tripod I gained in portability and precision because you can adjust the
height in order to find the exact focal point.
The umbrella with 16 ribs provides a very precise focal point in the
direction of the shaft. Its disadvantage
is that it is more fragile and more expensive, about 20€.
For
the grill I glued a small barbecue grill with high-temperature resistant
silicon. This is the weakest point of my
model because if you’re not careful the grill can fall off the tripod. I think that ideally the grill should be
soldered onto the tripod
I positioned
the silicon glue such that it maximizes the stability of the cooking pot. The pot doesn’t move at all.
The cooking
pot
The cooking pot gave me plenty to mull over:
what would be the best type? If I
let my imagination run wild, I thought that the ideal solar pot would be a Pyrex
pressure cooker in which one could place various black pots of different forms
and sizes. But let’s stop dreaming. In order to select the type of pot, I read
practically all of the reports on every type of solar cooker that I could find,
these are the conclusions that I came to:
·
Material: aluminium or thin steel.
· Type: lower is better than high, but with enough height for cooking. A low pot or a high frying pan is best.
· Color: black.
·
Lid:
black is better than glass.
·
Size: 20 cm in diameter.
About 1.5-2 litros.
At first I thought that the smaller
the pot the more quickly it would heat up, but then I realized that a small pot
is less efficient because it captures fewer rays..
Personally I
like frying pans or casserole dishes because they have most of these
characteristics and they may come with pressure lids that maintain the heat.
Steel ones are stronger than aluminium. Unfortunately I haven´t seen any
that are black.
They are all the colour of metal. One solution is to paint them with a black
matte heat-resistant spray paint that is used for barbecues. It is
not expensive and with practice good results can be achieved. .

In addition, I
used a second frying pan made of glass in order to insulate the first one. It is a bit bigger so I stuck on bits of
cardboard for a better fit.
Recommendations
Don’t take it lightly. It really heats
up. In order to prevent any type of
risk, it’s best to use gloves and sunglasses. Also it’s better to
cook while standing behind the cooker. That
way you also don’t create shadows on the reflector.
In order to capture the maximum solar radiation it’s necessary to turn the cooker at least twice an hour so it faces the sun. Turn it very slowly and carefully holding the stand and the pot or else removing them for a moment.
For transporting the pots it’s a good idea to use a basket in which they fit well. The basket will protect them as well as help conserve the heat.
I carried out this Project with lots of interest
and a fair bit of effort. I hope that it
helps in some way. If you decide to try
it out, please, I would love to hear about your experiences. If you wish, send me an email. I think that vegetables cooked in their own
juices, and new potatoes cooked in their skins would be delicious. Why not try them?
September 16, 2006