The
Barbara Kerr Solar Wall Oven Do-It-Yourself
Guidelines
By
Jim Scott, Kerr-Cole Sustainable Living Center, scottjl_79@hotmail.com
1.
Introduction:
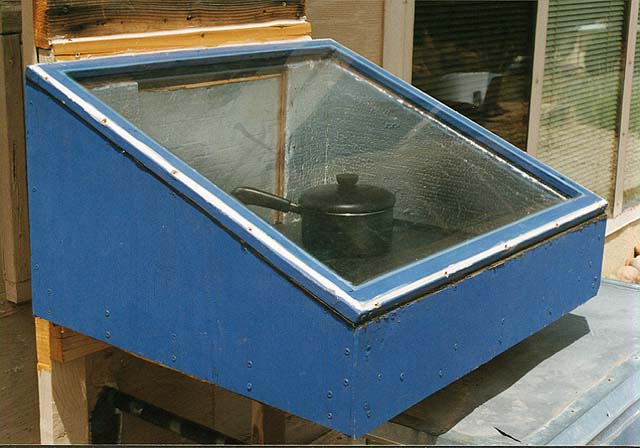
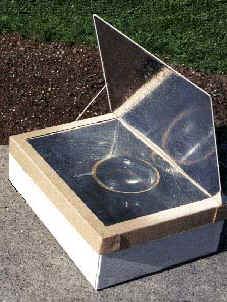
This
publication describes the considerations for designing and building a
slant-faced, reflectorless, through-the-wall solar box cooker, as depicted on
the Solar Cooking Archives web site:
http://solarcooking.wikia.com/wiki/Solar_Wall_Oven
This
image shows such a cooker with slanted front and rear wall segments. The
Kerr-Cole designs have dispensed with these angled panels in the interests of
easier construction and a roomier floor space (at the cost of slightly slower
cooking). This version is shown on the pages:
This
publication also covers the issues involved in installing the cooker in the wall
of a building. It does not provide detailed construction plans either for the
cooker or its installation. This leaves wide latitude for selection of materials
that are locally available and/or compatible with the type of home construction.
Throughout we assume a northern hemisphere location. Down Under readers will be
obliged to substitute “north” wherever “south” is encountered. Solar
Wall Ovens are available from the Kerr-Cole Center as completed units. Contact
us at for kerrcole@frontiernet.net
for price and delivery.
The
Solar Wall Oven also works very well as a freestanding cooker that can be
transported from site to site. When freestanding it can be aimed to keep it
pointed in the direction of the sun, which lengthens the number of hours it can
cook each day. When freestanding, this cooker gives excellent results both in
temperate and equatorial latitudes.
However
it is used, the rear-opening door of this design is a major convenience compared
to conventional top-opening cookers. We drill a hole in the bottom center of the
cooker that can mate with a small rod projecting from the top center of a
55-gallon drum. The oven is placed atop the drum such that it pivots on the rod.
It helps to soap the drum rim so that the cooker rotates easily. The drum is
half filled with water to keep the whole works from blowing over. In temperate
latitudes the cooker may be used freestanding during construction and then
attached when the house is ready.
Or, for
maximum convenience, one may wish have available for use both a freestanding and
an attached cooker.
2.
A Comment on Reflectors:
Although the basic design
concept of the Solar Wall Oven is to eliminate the need for reflectors,
nonetheless it’s usefulness can be enhanced if provision is made to employ
reflectors some of the time. This is true both for freestanding and
through-the-wall use of the cooker. The use of reflectors is an important topic
with a number of considerations pro and con. We will skip over these issues for
the time being and take up the matter later on in Section 12. For now we will
confine our attention to the simpler, basic, reflectorless design. Suffice it to
note that to date Barbara Kerr has used a wall mounted, slant-faced, box cooker
to do the bulk of her solar cooking in Arizona (35 degrees north latitude) over
the last 15 years and hers does not turn, nor does it have a reflector. Barbara
states, “It cooks all day without further attention. Three steps. Put the food
in, leave it alone, remove and eat.”
Barbara continues, “In
addition to requiring additional construction materials and labor, the need to
go outside to adjust reflectors would require attention throughout the day, as
well as eliminate its use for mobility restricted people. It also would make it
difficult to use on upper floors.” As well as sometimes using a freestanding
Solar Wall Oven, Barbara occasionally uses an outdoor freestanding cooker of a
different design, such as a SOS Sport, (www.solarovens.org) to handle the need to
aim an oven for cooking early or late in the day. The Sport has an optional
reflector that can be attached to enhance heat collection in marginal sun
conditions. She also may use a panel type cooker such as the CooKit, Solar Panel
Cooker or Reflective Open Box Cooker to capture low angle sunlight. See:
http://www.solarcooking.org/plans.htm#panel-style
3.
Site:
Slant-faced, reflectorless,
cookers mounted in a wall are suitable for temperate latitudes only. In tropical
regions, the sun will be on opposite sides of the home summer and winter,
progressively restricting the seasons of usefulness of a fixed mounted cooker
the closer to the equator it is installed.
In
northern temperate regions, the structure must have a south-facing wall
available for installing the cooker. True due south orientation is preferred for
the cooker. A wall-mounted cooker cannot be turned to follow the sun. A cooker
aimed SE or SW will limit afternoon or forenoon cooking respectively. A true
south cooker (without reflectors) will be effective from about 9 AM to 3 PM
solar time from mid February to the beginning of November (northern hemisphere).
It will still work for more easily cooked foods for the balance of the year from
about 10 AM to 2 PM.
The wall must be relatively
free of shading by nearby structures, geological features and trees for a large
percentage of the day throughout the seasons. The roof overhang may partially
shade the cooker in some seasons, hindering cooking, particularly in the
latitudes nearer the tropics. A detailed treatment of this topic is given in
Section 11.
The cooker is best suited for
homes designed with solar cooking in mind. It will work in existing homes only
if a suitable south wall location is available. Installation through a window
might be a practical and simple way to retrofit a Solar Wall Oven. Although we
have not tried this ourselves, it seems that if it were placed freestanding on a
shelf outside the window, it could be aimed from inside to follow the sun.
Optional auxiliary reflectors might be managed by reaching out the window, and
the cooker might be slid in and out for loading and unloading. If glazed with
lightweight plastic rather than glass, the cooker might even be moved during the
day to take advantage of which window is getting the sunlight.
The geographical restriction to the temperate zone installation would be much less of a consideration for dome shaped structures, or vault shaped structures with the long axis oriented east-west, than it is for vertical walled structures. There will be a much lower tendency for the building to shade the glazing when the sun passes on the “wrong side” of the house in the summer. In the tropics one should choose the south side if located north of the equator and the north side if located south of the equator. The glazing angle should be flatter than the 20 to 30 degrees suggested for the higher latitudes, as the sun will be generally high in the sky all year. Indeed, at the equator, horizontal glazing would be best, and one may chose to install the cooker on either the north or south side with equal justification. For a dome near the equator, any orientation will suffice, even due east or due west – as these orientations would sacrifice heat collection due to shading by the house only when the sun is near the horizon on the opposite side of the house.
4.
Cost and Difficulty of Construction:
Building
a durable, effective, slant-faced, through-the-wall, box cooker to attach to a
house is not as easy or as inexpensive as one might suppose.
There are problems with angled construction, providing a door, proper
sealing and obtaining proper materials – particularly the glazing. The
materials inside and outside the oven variously must withstand for the life of
the cooker (potentially 50 years): 350 deg F, high humidity, UV radiation,
freezing, impact, sandstorms (Arizona), moisture infiltration, abrasion by
cooking vessels and food spillage while achieving good cooking capability,
attractive appearance, food safety, easy maintenance and cleanablity. For
example, while there exist many inexpensive choices for insulating material,
these generally come at the cost of complex construction to contain them,
protect them, and keep them dry. Another example: although strong, available,
easy to fabricate into the desired pieces for construction and easily fastened
together, wood will not withstand intense solar radiation on hot exposed
surfaces, such as the rim of the cooker where the glazing is attached. Left continuously exposed to the weather, it shrinks, warps
and splits. It requires yearly repainting with marine varnish to prevent
degradation. As for glazing, you get a choice of cheap and not durable plastic;
high-grade, high temperature solar plastic (difficult to find or downright
unobtainable); or tempered glass (good looking and very durable but expensive
and heavy). Figure it may take a week of full days (assuming you do not have
access to a well equipped wood and/or metal shop), plus $150 and up in
materials, to build a glass glazed, plywood box cooker.
With this discussion of
suitable materials, one should keep in mind that Barbara Kerr discovered nearly
30 years ago that highly effective box cookers can be made out of cardboard,
wood glue, aluminum foil and window glass or plastic film. On the Solar Cooking Archives
http://www.solarcooking.org/plans/default.htm#box-style
web site and you will find plans for a number of cookers built this way.
The drawback is that typical cardboard cookers are not durable enough to be
built into a house. An exception to this might be the very robust, plastic
covered, cardboard cookers being made in Africa, as described in the book Appropriate
Paper-Based Technology (APT, A Manual).
2
Note that Barbara’s present
Solar Wall Oven, built with a plywood exterior, crushed newspaper insulation,
aluminum foil covered corrugated cardboard inner walls and tempered glass
glazing - put together with lots of silicone sealant - has remained in daily use
for many years. The outside does require repainting and re-caulking
occasionally. Freestanding Patio Oven cookers, built with these same materials,
have remained in continuous use for 25 years. They are still in good condition.
Ours has remained outdoors for this long, summer and winter in our desert
climate, without ill effect.
Builders constructing homes
of insulating alternative materials such as papercrete, strawbale, rastra block
and the like should consider incorporating wall ovens made of the same materials
as an integral component of the structure. This would simplify construction,
lower costs, allow for structural integrity and good environmental sealing, and
make it possible to aesthetically sculpt the cooker to blend in with the
exterior architecture. Be advised that this approach is conjectural. To date we
have no reports of cookers made this way – and there are concerns that the
higher thermal mass of these materials may impede cooking to a significant
degree. Therefore use of these materials would have to be considered
experimental until proven in practice. Our
Center plans to evaluate these materials soon. Contact us and we will share what
we have found out.
Another
possible low cost material that would require little in the way of tools or
experience in building things is paper mache’, which is an insulating
structural material. We have not experimented with paper mache’ cookers
ourselves yet to find out, for instance, if it presents thermal mass problems.
It is said to be easy to form in place and mold around the glazing, oven door
and house attachment, making it a good candidate for retrofitting into existing
structures. If coated on the outside with water seal and regular house paint, it
should be quite weather resistant. It also would be readily repairable using
paper mache’ “mortar”. If you use regular glass, and it eventually breaks,
paper mache’ could be easily cut to remove and replace the glass. The inside
can be moisture sealed with glued on aluminum foil or black BBQ paint. If you
have the time, but not much money, the paper mache’ solar wall oven might be
just the ticket, particularly if your carpentry skills are not the greatest. The
following link shows an African group that has started a business making things,
including solar cookers, out of paper mache:
5.
The Door:
The
door generally will be the biggest problem in construction. Beware of metal
doorframes or a metal rim on the door itself. Even thin metal foil will rob a
surprising amount of heat by conduction from inside to outside. Gaps around the
door allow air infiltration and therefore can cause heat loss. In calm air the
loss is surprisingly small even for a poorly fitting door. For a
through-the-wall installation with an otherwise tight oven construction, a
loosely fit door, say with 1/16 inch gaps all around will loose little heat. But
outdoors on a windy day the losses for a freestanding oven can be significant
indeed, leading to concern for achieving a tightly fitting door for this use.
Since
the door is in the rear of the solar wall oven, it is not subject to intense
solar radiation, even in freestanding use, making the use of wood feasible.
However wood door parts expand when wet from cooking vapors; the door will stick
unless constructed loosely. A tapered jamb “plug” door helps, but does not
solve the problem of achieving a tight fit while avoiding sticking. We have had
reasonable luck using a wood framed tapered door with a formed-in-place silicone
gasket incorporated in the doorjamb. The silicone is plastered around the
loosely fitting jamb and covered with waxed paper. Then the door is closed while
the silicone is uncured, forcing it to conform to the door. The results are not
necessarily pretty, and it will take days before the silicone has cured
enough to open the door without tearing the gasket, but it does work. A
commercial silicone high temperature gasket would quite likely give more
professional looking results.
Another way to cut down on air infiltration is to provide external flanges, perhaps an inch in width, attached to the outside of the door around the sides and top. We have also used 1 inch flanges mounted around the inside of the doorframe to good effect, but this cuts down the size of the opening a bit. Both inside and outside flanges have been found to be effective in minimizing air infiltration. It is suggested that flanges be used if the door does not fit tightly and the oven is to be used freestanding. An outside flanged door is shown at Dr. Paul Funk's SWO in Mexico
The door (as well as the rest
of the interior of the cooker) must be made of non-toxic materials that do not
out-gas when hot. In freestanding use the door must be quite durable. People
will tend to lift the cooker using the door handle as a grip. Worse, the door
will be subject to very heavy stress if it is allowed to flop down with the rear
of the cooker near the edge of a table, as a severe lever action will occur.
Rigid metal hinges usually result in alignment and/or attachment problems. The
writer prefers to hinge the door with cloth, such as cut from an old polyester
pant leg, impregnated with silicone. Two layers are used, one on the inside and
one on the outside of the hinge line so that the material resists peeling in
either direction. This is not the best looking solution, but it certainly works
well in practice.
Another hinge material that
works well is 1-inch web strapping. Three strips will suffice. Install ¼ -inch
grommets in the strap at attachment points, then install using pop rivets or
screws as appropriate.
Venting:
When an oven is tightly constructed all over, another problem often surfaces.
Moisture from the food condenses on the undersurface of the glazing, blocking
sunlight from entering the cooker and reducing the cooking capacity. One way to
handle this problem is to provide two holes through the door about 3/4 inch in
diameter. One may use 3/4 inch plastic hot water pipe to line the holes. One
hole should be down low. The other should be up high. The upper hole should be
closable to prevent unnecessary air circulation when the oven is dry (a plug of
cloth or cotton would do it). The lower hole may be left open unless there are
rodent and insect concerns. Another
design uses a single slat pivoted at a point half way between holes placed one
above the other at the top and bottom of the door. Rotating the slat opens both
holes variably to the same degree simultaneously. Yet another method employs a
Velcro hole cover movable to control the degree of venting. One normally keeps
the vents closed, opening them only to the degree needed to keep the oven from
steaming up.
Door
width: The wider the better. We suggest 26.5 inches to clear a full-size 26 by
18 inch baker’s tray slid in sideways. A tray this size allows cookware placed
on it to be moved in and out en masse. With a door this wide, the upper
doorjamb must be configured to carry a major portion of the structural load
across the back of the cooker. A 26.5-inch door will open into the space between
three studs on 16-inch centers by cutting out the center vertical stud. This
produces an opening 30.5 inches in width, providing enough room at either side
(a couple of inches) for external door flanges and for the construction of the
pass-through tunnel walls. This width is our preference, although narrower doors
have been used and may be preferable on some houses, depending on construction
details and the layout of the kitchen.
The door usually is
configured to open downward or to the side. The down opening door is perhaps
best, particularly if it is hinged at the bottom rear exterior corner of the
cooker so that the inside surface of the door in the open position lies exactly
at the level of the oven floor. This facilitates sliding cookware in and out
over the open door, easily and without spillage. The upper surface should be
covered with sheet metal (black or shiny) to combat abrasion and wear. Hard
anodized aluminum is OK, but it will scratch. Polished stainless steel will be
more durable. An upward opening door tends to be awkward and inconvenient unless
some means is provided to hold it in the open position when cookware is being
put or removed from the oven. For a through-the-wall installation with an upward
opening door, a counterweighted cable or cord running from the bottom edge of
the door exterior, up over the top of the cooker and down in front of the cooker
does the trick, as the door will remain in place when moved either to the open
or closed position.
The
door probably will need some sort of latch or catch to hold it completely
closed, particularly for an outdoor cooker. It should be operable one handed so
the cook can open or close the door quickly and surely with a pot in the other
hand. A Velcro strip attached to the top of the door makes a good latch for a
freestanding cooker if configured as a strap handle to peel open. The free end
of the strap should wrap over the top of the cooker a short distance for secure
fastening. The strap does not impede the full opening of the door to lie flat
and level. Since the outdoor cooker will have the rear of the cooker exposed to
sunlight, the Velcro will require occasional replacement. For better durability,
check out your local garden supply merchant for the sun resistant Velcro straps
used for tying up plants.
For through-the-wall mounted cookers, a short, pivoted slat of wood installed on the top center of the oven doorframe has been found to be quite practical as a latch.
6.
Insulation:
Allow
no thermally conductive sheet metal or metal foil paths from interior
metal surfaces to exterior metal surfaces anywhere, such as around the top where
the glazing meets the rim. The heat loss via such a path can be significant.
The
walls, door and floor should employ at least R-8 insulation, or close to it -
the higher, the better.
For most materials 2 inches
thick insulation will be sufficient. Often 4 inches will give somewhat better
performance, but heat loss through the walls is not of over riding concern.
A high-performance insulation
such as Dow Thermax polyisocyanurate foam board (the stuff with metal foil on
both sides) requires only one inch. Do not use the commonly available Dow Tuff-R
polyisocyanurate foam board (the stuff with black plastic on one side). It will
not take the heat due to lack of fiber reinforcement. Be careful, some stores
incorrectly call this stuff “Thermax”. It is not Thermax.
A
less appreciated consideration is the thermal mass of the interior walls that
covers the insulation. Use very lightweight materials. It has been determined
that, in real world cooking situations, a 1/8 inch thick Masonite hardboard oven
liner soaked up 20 % of the available heat compared to the 10 % passed by the 4
inches of rice hulls it contained.1 All of this heat loss becomes
unavailable for heating food. Use low thermal mass interior materials. Blackened
or shiny thin gauge sheet metal, black painted corrugated cardboard and
corrugated cardboard with a glued-on facing of aluminum foil (shinier side out)
all give excellent results. The foil-faced cardboard can last 10 years or more
before requiring re-surfacing.
For
lining the inside of the oven, the polyester coated “Aluminum Trim Coil”
sold in roll form by hardware stores works well installed with the dark side
showing (not the white reverse side). Some stores carry only a soft 12
mil type, chocolate brown on one side. Others carry a tougher 19 or 20 mil type
that is sold only in 24 inch by 50 foot rolls. It comes in several colors;
choose the dark brown if you cannot get black. The brown works nearly as well,
but is not optimum. The SOS Sport cooker (www.solarovens.org) uses a black polyester finish, 20-mil
aluminum as the liner because the heavier gauge and stronger alloy holds shape
better. The 20-mil aluminum is stiff enough structurally to form the inner wall
of the cooker without warping. Another liner choice is the less expensive,
shiny, 12 mil “Aluminum Roof Flashing”, which is quite soft. The surface of
this material is not of the highest reflectivity, but it does work pretty well.
It might work a little better if painted black.
For insulation, fiberglass
batt, an old down quilt, new quilt polyester fiber, feathers, rice hulls,
sawdust, crushed newspaper (each full size sheet crumpled to the size of a
lemon) all are effective. Fiberglass batt is recommended only as a last resort.
It sheds irritating fibers and is otherwise unfriendly to work with. It also
compacts severely if it gets wet. Do not use wood ash. It settles over time.
Beware of wool; weevils will eat it. Cotton has durability issues and is not
recommended. Paper mache’ might be OK, one you got it thoroughly dried, but
I’d use 4 inches since it has an R-value of about 2.5 per inch. Multiple
layers of cardboard with aluminum foil adhered shiny side out to both sides (use
diluted with wood glue) gives excellent results. See:
www.backwoodshome.com/articles/radabaugh30.html.
Do
not use polystyrene (Styrofoam) or polyurethane foam board. Heat will melt or
seriously degrade these materials.
One-inch
thick Dow Thermax fiber reinforced polyisocyanurate foam board is an excellent
insulator for solar ovens, but it is not commonly stocked and may be difficult
to obtain in less than semi truckload lots. A roofer’s knife is OK for rough
cuts if the foam board is going to be used as infill for cavities. However, if
you plan to use the foam board structurally and need to make precision cuts you
will find a knife does not “cut it”. Do not use a table saw or skill saw. If
the dust does not get you first, it will clog and burn out the saw motor.
We use a 5-inch diameter pizza cutter from a restaurant supply house
(special order). Even larger is
better – use a 6 or 7 inch garment cutting wheel if you can find one. Run the
blade along the edge of an accurately cut 3/4-inch thick guide board to keep the
cut straight and vertical. These blades have a flat and a beveled side.
Depending on whether you are right handed or left handed, you may need to remove
the blade and flip it over so that the flat side runs against the board, as this
yields a more accurate cut. The more commonly available 4-inch pizza cutter is
OK if you are not using a guide board, but with the board, the hub will bind
against the wood. For angled edges, rip cut a guide board in a table saw to the
desired slant. The writer prefers to make the awkward initial cuts on a 4 x 8
foot sheet on the floor with a sheet of plywood atop the foam so he can kneel on
it without crushing it as he runs the cutter along the guide board. Cut with a
board or piece of sacrificial carpet positioned under the foam so that the
bottom of the blade rides on it. This protects both the blade and the floor
beneath. It helps if the foam is raised about an eighth of an inch above the
board using a sheet of cardboard so that the blade cuts through the foil on the
bottom side of the foam.
The
dust produced in cutting Thermax has fiberglass particles in it. Do not rub
eyes. Use a breathing mask. Wear gloves to protect against foil cuts and glass
penetration into the skin. Vacuum the work area when done.
A
cruder and less accurate method of shaping foam board is to cut the pieces
slightly oversize with a knife, then carefully rasp to the correct dimensions
and angles. This produces loads of noxious dust, however, so perhaps doing this
indoors is not a good idea. Outdoors on a windy day would be a better idea.
Thermax,
being a closed-cell foam, works when wetted. It absorbs very little moisture,
and only on the edges where it is unprotected by the foil facing. This is a
major reason why the Solar Oven Society uses it in the manufacture of their
Sport cooker. See www.solarovens.org.
If
you are not using Thermax, keep the insulation dry. Most types are rendered
ineffective when wet. Some types will compress and not recover shape when dried
(notably fiberglass batt insulation). This causes poorly insulated voids hidden
from sight that can cause poor cooking performance to develop for an oven that
previously was working just fine. Water vapor from cooking food does condense in
the insulation if the oven cavity is not sealed. In Arizona we have never had a
problem with this due to the low humidity and tightly sealed construction of our
ovens. In Minnesota, which has humid summers, crushed newspaper insulation in an
unsealed cooker settled into a pile of paper mush in a single season.
Thermax is rated for temperatures up to 300 F. There is a concern that cookers with external reflectors will get hotter than that this and may degrade the foam insulation. An excellent candidate for insulation that will take the heat is polyester fiber from a fabric store. This is sold in “fiber fill” form (bulk for stuffing pillows) and in batt form (sheets for making quilts). Polyester plastic typically is rated to withstand 425 F. In a 350 deg F oven test that deformed test samples of non-fibered Tuff-R polyisocyanurate, polyester fiber showed no sign of degradation. This inexpensive and easily obtainable material has high loft (does not sag), drains water when wetted, does not rot or deteriorate, is easily handled, produces no harmful fiber “dust”, is easily cut with scissors and is simple to install by stapling or stuffing. When saturated under a faucet, a sample compressed about 50%, then ceased to collapse, suggesting that when using bulk fiber to stuff a cavity that it ought to be compressed 50% to forestall formation of voids. We have not tested the insulation R-value to date, so a thickness of 4 inches is suggested to be on the safe side.
7. Sealing:
For a wall-mounted oven, seal
the oven and pass-through tunnel against rainwater entry. This is particularly
if the cooker is integrated with the structure of the building rather than
simply mounted externally in the fashion of an air conditioner. If condensation
from food or rain entry is not controlled, the water may leak out the bottom of
the cooker and do damage to the building – resulting in peeled plaster, sodden
wallboard, dry rot in framing, etc. Rain must be shed or channeled where it can
do no harm. If the cooker mounts at the end of an extension tunnel projecting
from the house, judiciously placed weep holes may work to provide a drain path
for moisture to exit without getting into the structure of the building. The
seal should also prevent dust and bug infiltration into the oven and into the
house.
Whether wall mounted or
freestanding, the entire inside should be sealed to isolate the cooking space
from the insulation and structure of the oven. This holds moisture emanating
from food within the cooking chamber. Excess moisture can exit the oven via the
vent holes in the door. Sealing the oven chamber forms a barrier to keep
insulation dry. Furthermore this keeps material shed or emitted by the
insulation from getting into the food. This is a general concern for many types
of insulation. Thermax foam board, for example, may shed glass fibers - and it
has been observed when heated to emit a dark film of unknown composition that
deposited on adjacent reflective metal surfaces. We make it a practice to seal
all our oven interiors, regardless of insulation or construction materials.
100 % silicone caulking is an
excellent material as a high temperature, non-toxic, durable, UV impervious,
readily available and inexpensive all purpose sealant and construction adhesive.
It is tough, abrasion resistant, and flexible. Silicone stretches with thermal
expansion without cracking or pulling loose. We use it to solve all sorts of
construction difficulties in building solar ovens, such as sealing foam
surfaces, coating surfaces, forming gaskets in place, filling voids and gluing
parts together. However, as with life in general, “for every solution, there
is a problem”. The stuff is very messy to work with. It is difficult to
apply neatly. It gets all over the place and all over you and your clothes. Your
fingers transfer films of it onto surfaces where you don’t want it.
There, it acts a very good release agent, preventing later adhesion of
paint, glue or tape. Masking tape helps keep it off where it does not belong.
The writer finds that to achieve smooth surfaces, running a finger liberally
lubricated with saliva over the wet caulking gives good results (with practice).
Spit works better than plain water for some reason. It is alleged that a
weak dish washing soap solution will work too. Keep a lot of rags or a roll of
paper towels handy. You will need them.
100% silicone cannot be
painted. For exterior surfaces not subject to high heat, one may prefer to use a
water based latex caulk or a silicone/latex mix to seal joints. Be aware that
neither pure latex not the silicone/latex mixes will stick to 100% silicone, so
making the use of latex types adjacent to pure silicone on an adjoining surface
can be tricky. The latex is paintable, and much easier to apply. It cleans up
with water if smeared where it should not be. The silicone will refuse to be
removed from almost anything if it takes a mind to adhere to it.
Silicone is slow to harden,
especially in dry weather. This can greatly delay construction if you must wait
for it to cure before going on to the next step. It hardens about 1/4 inch in
depth daily at moderate humidity to a “green cure”, and it takes another
week to reach full strength. It takes forever in the summer in the arid
southwest. At our Arizona site in very dry, very hot weather, glazing attached
with silicone was sliding off the cooker several days later due to lack of
moisture in the air to react with the raw silicone. Putting wet pads on the
skinned over surfaces helps, as does putting damp rags inside the oven.
If one reads the labels down
at the hardware store, one discovers that not all silicone sealant is rated by
the FDA as being food safe. We often use whatever 100% silicone sealant we can
find in the local hardware store on the reasonable assumption that the food is
not likely to come in contact with it anyway. We prefer to use Dow Corning 999A,
which is labeled as food safe and which adheres well to all materials used in
solar oven construction - metal, paint, glass, plastic and wood. Other types may
be suitable as well. 999-A, while tough, is still rather soft when cured; other
formulations may be harder and therefore more desirable where exposed to contact
or abrasion. 999A is not readily available – one must go to an industrial
supply house. It comes in several colors. The clear is useful for attaching
glazing or other areas where the caulk should not show. The black is also good
to have on hand to darken areas inside the oven to help absorb sunlight, such as
the cut edge of foam insulation showing through the glazing.
We also keep some white handy, as the need for it arises from time to
time, such as gap filling between two white surfaces.
To make silicone stick truly
reliably, we sometimes use a nasty primer, Dow Corning 1200, which can cause
serious health problems in liquid or vapor form. This stuff is even harder to
get because it is a hazardous material that cannot be shipped via UPS or USPS.
We usually dispense with the 1200 primer and take our chances that most of the
time the silicone sticks well enough without it on a solvent cleaned and perhaps
roughened surface. According to Dow Corning literature, xylol, toluol, and
methyl ethyl ketone solvents (all highly toxic) (but not soap and water)
provide adequate surface preparation, but we have not tried this. Verbally the
Dow Corning tech hotline folk inform us that acetone or isopropyl alcohol works
nearly as well. Also they say that the liquid 1200 primer is toxic because of
the solvents used in it. However the chalky residue left on the dried primed
surface is a perfectly safe silicone carried by the solvents.
If you are using silicone to form a gasket, then you have the opposite problem: how to make it not stick to the sheet of material separating the surfaces during the curing process. For this purpose one uses 10% petroleum jelly dissolved in 90% mineral spirits as a release agent to coat the separator. Just paint it on and allow the solvent to evaporate.
8. Interior:
Raise the floor plate a
little so it does not directly contact the bottom of the oven box. Several ¼ x
¼ inch wood strips cut from square dowels will do the trick. This significantly
reduces heat loss from the primary energy absorber via the oven bottom (the
floor plate is the hottest part of the oven, except for blackened pot lids).
Painting the underside of this sheet with white BBQ paint to lessen losses has
been tried, but it is likely that this did no good since it is reputed that the
heat emissivity (infra red) of a white surface is the same as black. It may help
to have the underside of this plate left as bare silver colored metal to lessen
radiation loss downward toward the insulation, but there are those who claim
this is ineffective. We will be experimenting with some high tech insulating
paint that promises to be effective, according to expert information, to see if
it indeed will help in this location. Contact us for the results.
The upper surface of the
floor must be black (or other very dark color) to absorb sunlight and convert it
into heat.
We
suggest the use of a 0.062 (62-mil) black aluminum floor (best if
“hard” anodized for durability and easy clean up). The heavy aluminum
readily conducts heat to cooking pots. The SOS Sport cooker uses much less
expensive 19-mil polyester coated aluminum trim coil for the floor, which works
well, but eventually will eventually need repainting. Cooked-on food spills tend
to remove the polyester finish. It has not been determined how much better the
thicker aluminum works than the thinner stock in transferring heat from the
floor to the cookware. We intend to settle the issue in side-by-side tests this
summer, comparing 12-mil to 19-mil to 62-mil flooring.
One
can blacken oven surfaces and cookware with BBQ black paint. Black tempura
paint, such as produced by mixing the dry powder with white glue, is used by
some solar cooking practitioners, but others point out that the paint develops a
chalky white surface over time, lessening effectiveness in absorbing sunlight to
produce heat.
Oven
walls should be either dull black or highly reflective. Other dark colors will
work nearly as well. Both dark and shiny surfaces have been found to be equally
effective, but black paint is a lot cheaper than polished sheet metal. Black and
shiny panels can be mixed in the same cooker. White or light colored walls do
not work well; they scatter light back out through the glazing, wasting heat.
9.
Glazing:
The
glazing must be double pane. Single pane does not work for a reflectorless
cooker except in very strong and direct sunlight, and then only if the cooker is
free to be aimed at the sun. It is inappropriate for a reflectorless design
intended for fixed installation in a wall. Triple pane provides no advantage
over double pane.
Retail plastic sheets will
not work satisfactorily as glazing. They will warp, craze, cloud up and
disintegrate. Specialty heat and UV resistant plastic is not readily available.
Ditto for solar rated plastic film, which is virtually impossible to find.
Plastic film is not dog, goat or bird proof.
For
commercially purchased glazing, we use 5/8 inch overall, 3/8 inch spacing, dual
pane, 1/8 inch thick, tempered, clear glass insulated windows with a black or
dark bronze spacer bar separating the two sheets of glass. We specify butyl
sealant for heat resistance. This substance does not out-gas toxic vapor. Such
glazing works very well. It is also costly and heavy. For a 24 by 32 inch
window, we have paid as little as $50 and been quoted as much as $150, so it
pays to shop around. We hear conflicting reports on the use of specialty glass
that admits visible light but blocks the infrared heat radiation from escaping
the oven, with some workers claiming it works better and others saying it
provides no improvement over ordinary clear glass.
Double
pane windows often incorporate a fine diameter metal tube (it looks like a wire)
that extends from a corner of the assembly. The purpose is to allow air to enter
or exit the space between the panes to equalize inside to outside pressure,
depending on the altitude of installation. The standard practice of glaziers
when installing a window in a building is to pinch off this tube to prevent
moisture from entering the space and condensing. Barbara Kerr has solved
condensation problems that were occurring in solar cookers by pinching off this
tube, which she had previously been leaving open.
However the writer does not do this, but rather leaves the tube open, on
the theory that the heating and cooling of the oven creates pressure changes
that ought to be relieved. He does take care to orient the glazing so that the
tube is on the lower (sunward) edge of the cooker so that if moisture does
condense, it can run to the lower end of the glazing space and weep out the
tube.
Regular window glass is
relatively inexpensive but is not as durable for the long haul. The outside pane
will be vulnerable to impact (hailstones). The inside will be vulnerable to heat
stress cracking and being bumped by a pot. If you opt not to use tempered glass,
Joe Radabaugh
http://www.backwoodshome.com/articles/radabaugh30.html
recommends using double
strength rather than single strength window glass. Presumably because it is
thicker, it will hold up better than single strength. His designs, being of the
funnel reflector, 4-panel concentrator type, subject the glazing to quite
considerable heat stress. But then again the glazing size is small, reducing the
tendency to crack. Barbara Kerr counsels the opposite, stating that in her
experience double strength glass, being thicker, had a higher temperature
differential from inside to out, and therefore had a higher tendency to crack
from heat than single pane glass. She says that ¼ inch plate glass, except in
quite small panes, is almost certain to crack.
Perhaps a double strength outer pane and a single strength inner pane
would be the best compromise. Cracks in glass usually do not open to cause a gap
for loss of hot air from the oven, so there is no urgency to make repairs in
them, as they have little effect on oven temperature. If desired, a crack may be
sealed with a thin bead of silicone. Even ordinary clear 3-M “Magic Tape”
has proved to be quite durable for mending glazing.
The glazing must be sealed to
circumvent condensation between the layers. Moisture from cooking food will tend
to fog up this space and block a significant amount of sunlight. This usually
will not be a problem with commercially obtainable insulated glass windows,
which are sealed. If it becomes a problem with home made dual layer glazing, or
even with a commercial window, provide a couple of 1/16-inch diameter vent holes
to the outside air through the spacer between the panes. The first should be in
an upper (north) corner. The other should be in the opposite lower (south)
corner.
Tempered
glass is very strong in some respects. It is quite likely to survive a hard blow
from a baseball bat. However, be very careful not to nick tempered glass. If you
do, you will end up with an expensive pile of glass pebbles. One touch with a
metal screw, and the whole pane will magically crumble before your eyes. Take
pains to carefully pad the glass during handling and storage, paying particular
attention to the edges. If the glass is placed with its weight on a grain of
sand on a hard surface, the effect will have you on the phone ordering
replacement glass.
Glazing
of any type should be installed so that it can be replaced without undue effort
and without damage to the cooker. Making it
removable and also maintaining a moisture seal to protect the insulation space
between the walls from both the weather and oven cooking vapor may require ingenuity.
One solution is to seal the glazing to the rim of the oven with a bead of
silicone inside and out such that a knife blade can be slipped in to cut the
glazing free if need arises.
10.
Dimensions:
Size
counts: make the cooker big enough to cook a full meal for a family on a good
solar day. A big solar oven also will successfully cook smaller amounts under
less than ideal sun conditions. Furthermore, big pots, skillets, cookie sheets
and the like will fit in with room to spare for other cookware. We suggest it be
made big enough to contain two 13 x 19 inch “large” cookie trays. A 20 x 30
inch interior floor space works well; it will require glazing about 24 x 32
inches overall. This much floor space will accommodate 6 “standard” 3-liter
cooking pots (although cooking would be slow, even in strong sunlight, if this
many pots were heavily loaded and all put in at the same time). Most of the
cookers we have made over the years actually have been an inch or so larger than
this.
A freestanding cooker this size will require carrying handles to move it around, particularly if glazed with glass and/or made of plywood, as it will be quite heavy. Some folks put their cooker on a garden cart to move it around (to follow a sunny patch in the yard, for example), and to aim it at the sun.
Suggested
interior dimensions:
Floor:
20 x 30 inches
Back
Wall Height: 14
inches
Front
Wall Height: 5
inches
Door
Width:
26.5 inches
Door
Height:
11.5 inches (to clear 3 liter pots stacked two high)
Walls:
Vertical (not slanted)
Glazing
Angle:
24 degrees (9 inch rise in 20 inches)
The
angle is not critical. Anything between 20 and 30 degrees is acceptable, but
generally cookers have been built with angles between 20 and 25 degrees. Glazing
in the 25 to 30 degree range might be a better idea further north, say 45
degrees north latitude. The 14-inch height allows the upright placement of
gallon-sized jugs across the back of the cooker for water pasteurization.
A door of the recommended
height allows tipping a freestanding oven so that it rests on the rear door to
cook in low angle sunlight. This presents a steeply slanted glazing surface to
intercept most of the available light. For this position, the cooker is loaded
by placing pots on the opened door, then raising (rotating) the entire cooker up
with the door laying flat. The 11.5
inch height will clear two “standard” 3 liter pots (shown as "Three-pound
roaster" at:
http://65.108.108.197/catalog/supplies-c-2.html?osCsid=5cee5dfca0fbb80b13a6ab53dbc58f4b)
stacked one atop the other with the bottom of the upper one acting as the lid of
the lower one. The suggested door width will accommodate two such stacks,
allowing a total of four pots in the oven in this position.
You
may choose to increase the floor size some. The heights are well proven in
practice, and you change them at your peril. Too low and your pots may not fit.
Too high and the effectiveness of heat transfer into the food may suffer.
11.
Installation Guidelines:
The
floor of the pass-through tunnel should be set such that the oven floor is at
elbow height. Assuming the door opens downward onto the pass-through floor, the
upper surface of the door then will also be at the oven floor height, or close
to it. This is about 42 inches for a person 5 feet 6 inches in height. The
tunnel opening itself ought to be something like 18 inches in height to allow
adequate access and visibility into the oven. The tunnel walls ought to be
insulated to prevent heat loss from the home in winter or heat infiltration into
the home in summer.
 One
should consider installing a door at the kitchen (indoor) end of the tunnel.
This would be a second door in addition to the oven door proper at the far end
of the tunnel. The kitchen door may
open downward 90 degrees to form a shelf, or fold 180 degrees in any direction
against the wall to allow closer approach to the oven. The kitchen door provides
a barrier against loss of room heat via the pass-through tunnel walls – a
potential problem in winter. Ditto for unwanted heat infiltration from outside
in the summer. This consideration is significant if the tunnel walls are not
insulated. Another benefit of having doors at both ends of the tunnel is that
the space between them is often at a good temperature for raising bread dough.
For security against intruders gaining entry via the cooker, say by removing the
glazing, one might consider making this kitchen door stout and securely
lockable. See:
One
should consider installing a door at the kitchen (indoor) end of the tunnel.
This would be a second door in addition to the oven door proper at the far end
of the tunnel. The kitchen door may
open downward 90 degrees to form a shelf, or fold 180 degrees in any direction
against the wall to allow closer approach to the oven. The kitchen door provides
a barrier against loss of room heat via the pass-through tunnel walls – a
potential problem in winter. Ditto for unwanted heat infiltration from outside
in the summer. This consideration is significant if the tunnel walls are not
insulated. Another benefit of having doors at both ends of the tunnel is that
the space between them is often at a good temperature for raising bread dough.
For security against intruders gaining entry via the cooker, say by removing the
glazing, one might consider making this kitchen door stout and securely
lockable. See:
On
a southerly facing wall oriented somewhat to east or west, always slant the cooker
relative to the wall so that it faces due south.
For
a house not oriented on a true north-south / east-west axis, location of the
cooker on the most southerly facing wall as close as practical to the
southernmost corner will give good results. In this position, the cooker will
tend not to suffer shading in the afternoon either from the roof overhang or
from the house walls.
For a cooker mounted in a
true south-facing wall, installing it close to the east or west corner will
extend cooking time, particularly in summer when the sun rises and sets
considerably north of the due east-west axis. For example if mounted at the west
corner, it will catch late day sun for a longer time, particularly if fitted
with a reflector which can be brought in to play to scoop in the low angle light
until the sun hits the horizon. As in the case for all fixed mount cookers, this
optional reflector would have to be hinged or removable to keep it from getting
in the way during portions of the day.
The
cooker may be installed flush against the house if there are no eaves. However,
if the house does have eaves, one must space the cooker out from the
exterior of the house far enough to clear the shadow of the roof overhang. This
means that the pass-through tunnel must extend beyond the exterior wall of the
house to reach the rear of the cooker. The length of this projection will be
greater, the closer to equator the cooker is installed. The worst case will be
at solar noon at the summer equinox (June 22 in the northern hemisphere.)
Assuming the cooker is installed in vertical rectilinear wall oriented due south, the following formula applies to determine how far the top corner (northernmost edge) of the glazing must be positioned beyond the exterior wall of the house, given the latitude, the depth of roof overhang and the distance of the top corner of the glazing below the roof overhang.
L = latitude
F
= latitude factor from table
R
= roof overhang (horizontal distance from eve edge to wall)
G=
glazing distance below the roof overhang (vertical distance from horizontal plane
of eave edge to horizontal plane of topmost edge of glazing.)
P = projection of
pass-through (distance from house exterior wall surface to edge of glazing).
P = R – F x G
This equation is presented below as such calculations appear on tax forms.
1. Enter latitude degrees 1.__________
2.
Enter factor F from the table below
2.__________
3.
Enter glazing distance G
3.__________
4.
Enter roof overhang R
4.__________
5.
Multiply line 2 times line 3 and enter the result here
5 .__________
6.
If line 5 is greater than line 4, enter zero on line 8
7.
If line 5 is less than line 4, subtract line 5 from line 4
and
enter the result on line 8
8.
Pass-through projection distance P
8. __________
Latitude (L) Factor (F) Latitude (L) Factor (F)
26
.004
35
.148
27
.020
36
.164
28
.036
37
.180
29
.052
38
.196
30
.068
39
.212
31
.084
40
.228
32
.100
41
.244
33
.116
42
.260
34
.132
or:
F = (L
– 26) x .016 + .004
and:
P = R – ((L – 26) x 0.016 + .004) x G
(for
the more mathematically minded)
12.
Reflectors:
The slant-faced box cooker,
of which the Solar Wall Oven is an example, is intended to work well without
reflectors. Despite that, one is tempted to add reflectors to “soup up” the
performance beyond the original design objectives. Primarily, reflectors added
to either freestanding or wall mounted cookers will allow cooking in less than
ideal sun conditions: partial cloudiness or low sun angle (high latitudes,
winter, early or late in day). They also yield faster cooking and pasteurization
under any sun conditions, allowing an oven to cook significantly more food or
purify much more water in a day. An important consideration here is that cooking
with reflectors extends the number of hours for cooking from earlier in the
morning to later in the afternoon. This allows use of the sun before the clouds
come in or food to be kept hot for a later dinner. It also allows more effective
use of low angle sunlight during winter months to increase cooking power. The
desirability of enhancing heat collection using reflectors increases with cold
weather, high altitude, high latitudes, short winter days, wind and heavy loads
of food – all factors that impede the cooking process. The penalty for using
reflectors is greater complexity of construction, unsightly appearance,
vulnerability to wind (breaking the reflector panels or overturning a
freestanding cooker), the need for frequent re-aiming, the need to manage the
reflector angles, personal and neighborhood glare nuisance, the danger of
overcooking or burning food, and concern for damaging the oven due to
overheating. For a through-the-wall installation, reflectors generally will
require the cook to go outside to adjust the reflectors occasionally, negating
some of the convenience having a built-in solar cooker. Overheating is of
particular concern if you elect to use Thermax polyisocyanurate foam panels for
insulation – you are pushing this material to it’s limit when the oven
reaches 300 deg F, which can happen without reflectors with an empty oven in full sun. Reflectors can raise the oven temperature to 350 deg F, making
one worry about damaging the insulation, or otherwise shortening the life of the
cooker. Reflectors may also damage
plastic glazing due to overheating.
One way to approach the
reflector issue is to construct the oven without reflector(s), then add them
later if the cooking situation seems to warrant it. For high efficiency,
slant-faced, box cookers such as the Solar Wall Oven or the Sport, the writer
views reflectors as an option for occasional use when needed, but to be taken
off the cooker under good sun conditions. He may, for example, get the food up
to cooking temperature in the early part of the day, then remove the reflectors
to prevent overheating problems for the balance of the day. Barbara Kerr, on the
other hand, considers putting reflectors on a Solar Wall Oven to be too much of
a nuisance to be bothered with, whether freestanding of wall mounted.
The
type of reflector to use depends on whether or not the oven can be turned to aim
at the sun and whether or not the oven is intended for use also as a retained
heat “haybox” type cooker. We need to consider through-the-wall mounted and
freestanding cookers separately.
For
through-wall-installations in temperate latitudes,
the Kerr-Cole Center has come up with an effective design we have dubbed the
“3-panel adjustable reflector”. See Figure 1. The reflecting panels are
hinged for repositioning to collect sunlight to good advantage all day long.
Compared to a freestanding cooker, a cooker installed in a wall with a 3-panel
adjustable reflector has the advantage of not needing turning to face the sun.
Only a panel angle adjustment three times daily is required. It also has the
advantage of having available the solid structure of the building to brace the
panels against the wind. This overcomes a couple of the drawbacks of reflectors,
the need for frequent re-aiming and the vulnerability to wind. The inward slant
of the panels also means that nuisance glare is eliminated. The reflector can be
mounted to the house and cooker supports rather than the cooker itself,
simplifying oven construction and installation considerations. An adjustable
3-panel reflector does not need much attention. An initial setting in the
morning followed by a mid day positioning followed by an afternoon positioning
will allow good heat collection all day long. A clever person might even devise
a way to adjust the panels from indoors, eliminating the need to go outdoors.
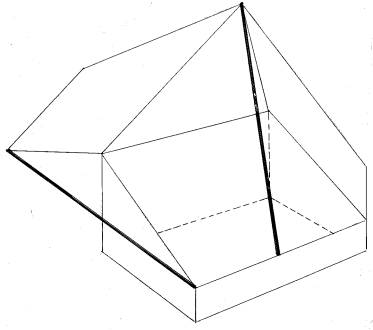
Figure
1:
Solar Wall Oven with Experimental 3-Panel Reflector. A south facing
installation is depicted in late day configuration to collect low angle sunlight
from the southwest in winter. West panel extended
fully. East panel brought in fully. The front strut is a fixed length, tensioned
rod to rigidly brace the fixed rear reflector perpendicular to glazing. The
adjustable length tensioned rod for holding the west panel in position is also
shown. A third strut (not shown) is used to hold the east panel when it is not
fully brought in. In mid day the east and west panels are partially brought in.
In morning the east panel would be fully extended and the west panel would be
fully brought in.
This design was successfully used to collect sunlight with the sun close to the horizon at 35 degrees latitude on a cooker with 20 degree slanted glazing. The dimensions and angles, as shown in Figure 2, were a "cut and shoot" quickie design. They were not mathematically determined and no claim is made regarding optimal performance for the given latitude and glazing angle.
The struts for the reflector panels may attach to the oven as shown, or may attach to the house or oven mounting structure. As shown, the rods ought to be tensioned - that is a cord or an elastic band should strongly pull the panel toward the oven attachment point of the rod. The cord should not fasten to the rod itself. A similar arrangement would work if the rods attached to the house. One half inch diameter wood dowels serve well as struts.

Figure 2: 3-Panel
Reflector for Fixed Installation of Solar Wall Oven.
At
our 35 degree latitude, we have found that this 3-panel adjustable reflector
works very well in the fall, winter and spring seasons for a due-south, fixed
aim cooker in terms of power collection, length of cooking time and simplicity
of use. It is not effective in the
summer, but neither is it needed in the months of long days, hot weather and
high angle sun. The cooking capacity of the basic Solar Wall Oven (i.e., without
reflectors) reaches a maximum in the weeks before and after the summer solstice
(June 22). The reflector gives a boost when it is needed, in the cold, short,
low sun angle, winter months. From the fall equinox (Sept 22) through winter to
the spring equinox (March 22) effective heat collection would be from sunrise to
sunset. At the equinoxes the reflectors will be effective 12 hours from 6 AM to
6PM, yielding the longest cooking times of the year.
After the spring equinox the
time duration of effective heat collection of the reflectors progressively
diminishes. The reflectors will remain effective until perhaps 6 weeks after the
spring equinox (until May 10). This loss of effectivity of the reflectors occurs
because the sun rises and sets north of the east-west axis during the summer
half of the year, with the result that the house blocks light early and late in
the day. In the fall, the reflector will become effective again about 6 weeks
before the fall equinox (until Aug 10). The duration of effective heat
collection added bys the reflectors progressively increases as the fall equinox
approaches.
In the intervening 3 summer
months between May 10 and Aug 10 the reflector does not help for three reasons.
First, until about 8 AM the house will block the sun. Second, by the time it
reaches due east at about 8 AM and can illuminate the cooker; the sun will be so
high in the sky that the reflector can collect little additional light. Third,
toward noon the reflector will generally be in the way and actually shade the
glazing. As the sun travels toward the west in the afternoon the reflector will
be ineffective in the same way it was in the morning. Conclusion: In the
interval between May 10 and Aug 10, the reflector should be either removed or
folded back out of the way.
For
an in-wall installation in the tropics
(possible in a domed or vaulted structure only) (see discussion in Section 3),
the reflector design must be different – the adjustable 3-panel configuration
will not work. A single panel will work, slanted inward to catch low angle light
for horizontal or near horizontal glazing. It should be removable so that it can
be placed on the either the east or west lip of the cooker to collect light
early and late in the day. Mid day the sun will be high overhead, and the
reflector will not be needed to redirect low angle sunlight; it should be
entirely removed until evening to keep it from shading the glazing. Observe that
near the equator a cooker with an eastward facing reflector will cook breakfast.
This is an important consideration for architects and designers of equatorial
dome shaped homes.
Instead
of a single reflector that the cook moves from the east or west lip of the
cooker, one may hinge reflectors to the east and west lips of a flat glazed
tropical cooker. By adjusting the
angles of the panels to morning, mid day and evening positions, this
two-reflector design can be effective all during the day in a fashion similar to
the 3-panel reflector for temperate latitudes. This type of design has the
advantage of collecting extra light in less than full sun weather
such as on a pertly cloudy day.
For
a freestanding cooker,
there are two common choices for reflectors, the classic 1-panel rear mounted
reflector and the 4-panel “funnel” type. These types each have their
advantages and disadvantages for a freestanding cooker. Neither will work for a
fixed mount installation, as they both require the cooker to turn to face the
sun.
The
1-panel reflector has a major advantage
in that, if the reflector panel is made of foam insulation board, it can be
folded down to insulate the glazing (the major source of heat loss from the
cooker). This allows use of the
cooker as a retained heat box (“haybox”) to keep food cooking when the sun
disappears, to keep food warm until dinnertime, or to lessen power requirements
if auxiliary heat (see Section 13) is employed to use the cooker as a non-solar
oven. A one panel cooker not only needs occasional re aiming to face the sun,
but it also requires the reflector angle to be periodically adjusted to bounce
the sunlight into the oven space. A cooker with a single panel reflector can
collect heat with the sun very low in the sky. The cooker need not be flipped to
lie on its back to catch low angle sunlight. The need to do this when using a 4
panel reflector creates an inconvenience if there is food cooking in the oven,
as all the cookware must be removed to get the cooker from “summer” to
”winter” position, and probably not all of the cookware will fit back in due
to lessened floor space. A conventional box cooker with a single reflector is
shown at:
The 4-panel reflector
requires an auxiliary insulating blanket or panel to achieve “haybox” heat
retention. There are no elevation angle adjustment difficulties with this type,
but it cannot collect low angle sun with the cooker resting normally on its
bottom. The cooker must be tipped forward on its front (see Section 11) to its high
glazing angle “winter” position to collect light from near the horizon, and
it is likely the lowermost reflector will interfere with placement in this
position unless the cooker is put on a stand. This type reflector on the SOS
Sport cooker has been observed to give excellent results (temperature exceeding
220 deg F) in Minnesota (45 degrees north latitude), in December, cooker resting
on a snow bank in “winter” position, with a high outdoor temperature of –3
deg F for the day. A conventional box cooker with four reflectors is shown at:
13. Auxiliary Heat:
In the absence of sun, a
200-watt auxiliary heater (such as an incandescent light bulb installed in the
oven cavity) will keep food hot enough to prevent incubation of food spoilage
microorganisms before dinner is served. If one places insulation (an old quilt
for example) over the glazing, only 100 watts is required. Use a thermometer to
verify that the oven remains 150 deg F or above. Foods held more than 2 or 3
hours in the incubation temperature range between 50 deg F and 150 deg F may
suffer serious spoilage. Toxins from bacteria such as botulism (which is not
totally destroyed below 240 deg F) can cause fatal food poisoning. Foods in the
danger zone of temperature must either be cooled below 50 deg F or reheated
above 150 deg F to inactivate microorganisms. Food that has slowly cooled from
cooking temperatures down through the danger zone over a period of 2 or 3 hours
to below 50 deg F should not be re-warmed later to again reside in the danger
zone, but rather should either be eaten cold or brought to cooking temperature
above 180 deg F. The point is that the total time the food remains at
incubation temperature over more than one episode of cooling and warming should
not exceed 2 or 3 hours before the food is brought to cooking temperature to
sanitize it.
With 200 watts and the glazing covered with insulation one may continue or even initiate the cooking process. The writer slowly cooks food this way on occasion, using the Solar Wall Oven as a sort of giant crock-pot. This is a good way to cook the beans overnight for the next day’s chili if sufficient electrical power is available to keep the heater on at night. The heater should be thermostatted to prevent overheating. One must protect against inadvertently leaving the heater on with the oven in full sunlight, particularly if the reflectors have not been removed.
References:
1.
Paul A. Funk and William F. Wilcke, University
of Minnesota Dept. of Agricultural Engineering, 1390 Eckles Ave., St. Paul MN
55108, Draft of presentation to the 1992 World Conference on Solar Cooking, “A
Solar Box Cooker for Mass Production in East Africa”, Based
on Paul Funk’s master’s thesis at U. MN, Dec. 1992, “Analysis
of a Solar Box Cooker for East Africa”
This
article analyses where the solar energy that enters a cooker goes in the time it
takes to get the food to cooking temperature: how much heats the food, how much
heats the oven box, how much escapes through the sides and bottom and how much
escapes back out the glazing.
2.
Bevill Packer, Chapter 10: APT
solarware, “Appropriate Paper-Based Technology (APT, A Manual)”,Intermediate
Technology Publications Ltd.,103-105 Southampton Row, London WC1B 4HH, UK, ISBN
1 85339 268 5
Sources:
1.
Material for reflectors:
Highly
reflective polished metal surfaced plastic film may be obtained from Nielsen
Enterprises: http://www.mirrorsheeting.com/.
This material is suitable for external reflectors. Our experience with using
plastic reflecting film inside the cooker is that it gets very brittle and
fragile after a year or so.
2.
Black
paint:
For both oven
interiors and cookware we use a 1200 deg F BBQ black paint such as Rust-Oleum
High Heat enamel, UPC 0 20066 77788 3, also designated as (BAR-B-Q-BLACK 7778).
When used on cookware, it will adhere better (last longer before requiring
repainting) if the surface is roughed up. We scour glass vessels with sand. One
might wire brush a metal pot. Do not allow paint to lap into the interior of the
pot.