an alignment template for unattended solar cooking
li-yan zhu and yun k. kim
introduction
a focusing (e.g., parabolic) solar cooker needs to face the sun, to receive maximum solar power.� with a pair of suitable sunglasses, it is possible to check the status of present alignment by looking at the cookware.� focused sunlight must strike dark surfaces of the cookware.�� a small piece of cardboard (or a business card) can be waved around the cookware, to check if any reflection misses the cookware.� this method is intuitive, but may strain, or even harm your eyes.� it is also tedious, and interferes with cooking.�
for safety and convenience, every focusing solar cooker should be equipped with an alignment guide.� a simple yet effective guide consists of a pinhole which casts a bright spot into the shade of the cooker, and a chart which contains a single mark. the mark should be created at night, under the moon (or a distant lamp).� it does not matter where the moon is.� first ignore the spot.� align the solar cooker by looking at focused moonlight on the cookware.� then mark the location of the bright spot. once the mark is made, the alignment can be checked without looking at the cookware.� the alignment is exact when the bright spot falls on the mark (fig. 1).�
to minimize the frequency of adjustment, the reflector should aim ahead of the sun.� thus the simple mark described above is inadequate.� we shall describe in this article how to align the cooker ahead of the sun, so as to lessen or eliminate the need for subsequent adjustment.� this technique is vital to the success of unattended parabolic solar cooker, first described in the spring of 2002 [1].��

fig. 1� a simple alignment guide consisting of a pinhole and a mark
the present time and the lead-time
in order to aim ahead of the sun, the pinhole requires no modification.� however the desired spot location depends on the present time and the lead-time.� the former is the time when you set up the solar cooker.� the latter is the elapsed time from �set-up� to �facing the sun�.� the alignment chart must allow you to specify these two parameters effortlessly.� we chose to display the present time by a curve, and the lead-time by a tick on the curve (fig. 2).
because cooking can start over a wide range of time, the chart contains a family of curves.� for convenience we space the curves one-hour apart, and label every other curve.� the user can choose the curve closest to the present-time, or interpolate between two adjacent curves.� similarly the desired lead-time may vary over a wide range.� for convenience we space the ticks 10-minutes apart, and label every other tick.
for example, if you are setting up your cooker at 9 am, and wish to cook unattended for two hours (120 minutes).� then the present time is 10 am, and the lead-time is 60 minutes.� simply find a curve labeled �9 am�, and locate the tick labeled �60 minutes.��� then adjust the cooker to bring the bright spot onto this tick on the first curve only.
we shall now examine the chart more closely.� at zero lead-time, the spot location is independent of the present time.�� therefore all curves intersect at a common point, which is the same alignment mark in fig. 1.� it will be called the center mark in the sequel.
assume that the cooker is set-up for a positive lead-time.� as the sun moves over the sky, the cooker remains stationary.� the spot moves on the chart toward the center mark, then goes beyond the center mark to the other side of the chart.� the path of the spot does not coincide with any printed curve.� it is more like a straight line.� the reason is simple.� in the previous example, the reflector will face the sun at 10 am.� suppose that the cooker were set up at 9:30 am, with 30-minute lead-time, it would also face the sun at 10 am.� in both cases the desired cooker orientation is identical.� thus the spot location at 9:30 am is identical.� however the �present time� would be 9:30 am in the second case.� thus the spot will not fall on the �9 am curve� at 9:30 am.�

fig. 2� an alignment chart for 40�n latitude at summer solstice (june 21).
more about the present time
the present time used in the derivation of alignment chart is local astronomical time.� if you live in the middle of a time zone, and if your residence is not using daylight saving time (summer time), then your clock is correct for alignment.� however in the western part of china, the �official time� may be far off the local astronomical time.� you may either set a dedicated clock to the local astronomical time, or you may re-label the curves on your alignment chart.� in either case you need to find out the amount of correction.
the first method is to consult a map, find out the local longitude and time zone.� then do a little calculation, if you are familiar with geography and astronomy.� the second method is mark the direction of south, which can be done at night by finding the north star in the sky.� then note your clock reading in the day, when the sun is at the exact south.� the third method is to try alignment using your clock time once.� record your clock reading (e.g., 10 am).� then observe the path of the spot.� draw a line through center mark, in parallel with this path.� the curve closest to this line shows the local astronomical time (e.g., 11 am).� in the example shown in parenthesis, your clock is one-hour behind for the alignment.
neither one of the above three methods are trivial.� however in most regions the clock time is just fine.� the manufacturer or distributor of solar cookers should work out the correction, and re-label curves on the alignment charts.
location and season
movement of the sun depends on latitude and season.� therefore an alignment chart is not universally applicable.� a new alignment chart is needed when a cooker is relocated at least 10� south or north.�� at any fixed location, three or more charts should be made to accommodate changes in the season.� for convenience we represent the season (or date) by angular position of earth in its orbit around the sun.� the angle is 0 at the winter solstice (dec. 22), and increases with time, to 180� in the summer solstice (june 21).� the cosine of this angle decreases from 1 to �1.
three charts are adequate in regions without daylight saving time.� intuitively, the charts should be designed for i) winter solstice, ii) spring and autumn equinoxes, and iii) summer solstice.� however the best solution is to divide the range of cosine (-1,1) into six uniform intervals.� then make charts for the 1st, 3rd, and 5th partitions (where the cosine equals 5/6, 0, and �5/6).� dates for changing charts are at the 2nd and 4th partitions (where the cosine equals �1/3).�
in summary
o the winter chart is optimized for 48� angle.� it is used between oct. 10 and march 1.
o the spring chart is optimized for 90� angle.� it is used between march 2 and april 11, and again in the autumn, between sept. 11 and oct. 10.�
o the summer chart is optimized for 152� angle.� it is used between april 12 and sept. 10.�
in regions where daylight saving time is adopted, it may be more convenient to change the chart when the daylight saving time begins or ends.� in the us, the charts can be designed as follows:
- the winter chart is optimized for 38� in the orbit, used from the end of daylight saving time to feb. 15.
- the spring chart is optimized for 79� in the orbit, used from feb. 16 to the beginning of daylight saving time, and again in the autumn from sept. 10 to the end of daylight saving time.� two sets of present times are printed on this chart�one for spring (regular time), another for the fall (daylight saving time).
- the summer chart is optimized for 126� in the orbit, used from the beginning of daylight saving time to sept. 9.
better result can be obtained if spring and summer intervals are each split into two intervals.� the total number of charts is increased to five:
- the 1st chart is optimized for 38� in the orbit, used from the end of daylight saving time to feb. 15.
- the 2nd chart is optimized for 68� in the orbit, used from feb. 16 to march 1, and again from oct. 13 to the end of daylight saving time.
- the 3rd chart is optimized for 90� in the orbit, used from march 2 to the beginning of daylight saving time, and again from sept. 11 to oct. 12.
- the 4th chart is optimized for 113� in the orbit, used from the beginning of daylight saving time to may 19, and again from july 26 to sept. 10.
- the 5th chart is optimized for 143� in the orbit, used from may 20 to july 25.
two sets of present times are printed on the 2nd and 3rd charts�one for spring (regular time), another for the fall (daylight saving time).
the default elevation
since the alignment chart is attached to the base, its shape is affected by the angle between the principal optical axis and the normal vector of the base.� this angle is called the default elevation [1].� it was a selected in the design stage, to optimize robustness of the reflector during routine usage, and to minimize the range of elevation adjustment.� it needs to be checked during assembly, and checked again after assembly (before the alignment chart is generated).
to measure the default elevation, the principal optical axis must be identified.� the first method is to utilize the fact that this axis is also the axis of symmetry.� place two circles, one very large and one very small, into the reflector.� adjust each circle�s position such that it fits very well in the parabola.� the line through centers of both circles is the principal optical axis.� the second method is to place the cooker (with a cookware) in moonlight.� then adjust the cooker orientation for best focus.� the direction of moonlight is the direction of principal optical axis.� with either method the angle between the principal optical axis and the line perpendicular to the base is the default elevation.
making and using the alignment charts
a microsoft excel spreadsheet is attached to this article.� click the highlighted link to open.� it contains complete instruction on its structure and usage.� we shall only mention that it requires four input parameters:
- distance between the pinhole and the base;
- season in the year;
- latitude of the cooker;
- default elevation of the cooker.
the computer generates a chart which will most likely be printed in the right size, so that it can be used directly without modification.� however if your computer or printer has unusual settings, the print may be distorted (uniformly in each direction).� in that case you may want to use a photo editor to stretch/compress it into the right size, or modify the chart in the spreadsheet.
since several charts will be used in succession, the chart should be easy to mount onto and remove from the base. to attach a chart onto the base, we shall first locate the center-mark by aiming the reflector directly at the moon as described in the introduction.� then orient the chart as follows:� first identify the side with a label (�this side is close to the rim and parallel to the shorter edges�) on the chart.� then identify one of the two shorter sides on the base, which is closest to the rim of the reflector.� these two previously identified sides should be close to and parallel to each other.
�
the angular tolerance of reflector described in [1] is 15�.� in terms of spot location on the alignment chart, it is half of the curve-length.� no much loss in cooking power or duration will result, if the spot deviates from its ideal location by a small fraction of this tolerance.� for example it is ok for the present time be one-hour off, because the resulting error in the spot location is equivalent to approximately 1/6 of the tolerance.� as another example if corresponding ticks in two charts (intended for different latitude and/or season) are no more than 10% of the curve-length apart, these two charts may be combined, or used interchangeably.
the next section explains how the spreadsheet was written.� it is rather mathematical, and is not required for ordinary readers.� please skip to the summary.
derivations
to an observer fixed to an inertial frame outside of the solar system, the planet earth obits around the sun about a fixed axis z, and spins about a fixed axis z (fig. a1).� both z and z are unit vectors. the angle between z and z is approximately 23.5�.� for convenience denote its complementary angle
g0=90�-23.5�=66.5�.��������������������������������������������������� (1)

fig. a1� a right-handed cartesian coordinate system fixed to an inertial frame
define two additional unit vectors
y=(z�z)/|z�z|,������������������������������������������������ (2)
x=y�z.���������������������������������������������������������������������� (3)
xyz is a right-handed cartesian coordinate system, in which
����������� z=xcosg0+zsing0.�������������������������������������������������������� (4)
let the sun be at the origin of xyz coordinate system.� then the earth orbits in the xy plane.� its position is better described by its polar coordinates (x,b), where b=0 at the winter solstice and increases with time.� sunlight strike the planet earth in the direction:
����������� r=xcosb+ysinb.��������������������������������������������������������� (5)
the angle g between r and z varies by season:
����������� cosg=r�z=cosg0cosb.��������������������������������������������������� (6)
the xyz coordinate system was established for the derivation of equation. (6).� it will not be used again in the sequel.
to an observer fixed to the earth surface, the sun orbits around him once a day.� the sunlight sweeps over a cone whose axis is z, and whose apex angle is 2g.� the observer can also identify the local latitude q, and an upward direction n.� let
y=(z�n)/|z�n|,������������������������������������������������������������� (7)
x=y�z.������������������������������������������������������������������������ (8)
xyz is a right-handed cartesian coordinate system fixed to the earth (fig. a2).� the x-axis points up and leans toward the equator; the y-axis is horizontal and points to the east;� the z-axis points to the north star. in this coordinate system, the normal vector is:
n=xcosq+zsinq.����������������������������������������������������������� (9)
establish a polar coordinate system (x,f) in the xy-plane. the angular coordinate f is a measure of the sun�s movement around the observer.� it is zero at noon. the direction of sunlight depends on season (g) and time (f) in the day:
�r=-(xsingcosf+ysingsinf+zcosg).������������������������������� (10)
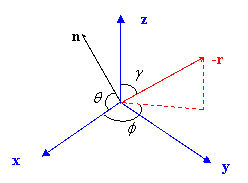
fig. a2� a right-handed cartesian coordinate system fixed to the surface of earth
we will also need a coordinate system ijk fixed to the reflector (fig. a3).� let k be a unit vector pointing outward along the principal optical axis.� we want k to point at the sun at a given time f0, i.e.
�k=-r0=xsingcosf0+ysingsinf0+zcosg.������������������������� (11)
to adjust the angle of elevation, the base-plate pivots about axis j which is orthogonal to both n and k.� let
j=(k�n)/|k�n|,������������� ����������������������������������������������� (12)
i=j�k.������������������������������������������������������������������������� (13)

fig. a3� a right-handed cartesian coordinate system fixed to the reflector
for economy no dedicated screen will be erected in the ij-plane.� sunlight coming through a pinhole illuminates a spot on the base plate tj. �thus we encounter yet another coordinate system tjp (fig. a4).� since the t axis is at an angle t from the i axis,
t=icost-ksint.������������������������������������������������������������� (14)
a vector normal to the base plate is
p=isint+kcost.������������������������������������������������ (15)
let h be the distance between the pinhole and the base plate.� then coordinates (t,j) of the spot are:
t=h�(r�t)/(r�p),�������������������������������������������������������������� (16)
j=h�(r�j)/(r�p),�������������������������������������� ����������������������� (17)
to locate the origin o of tj coordinate system on the base-plate, let� t=j=0 in equations (16) and (17).� thus r, which runs from the pinhole to the origin o, must be perpendicular to the tj-plane.� for convenience we shift the origin to the �center-mark�, which is the spot location when k points directly at the sun.� the j coordinate remains unchanged.� however the t coordinate is replaced by
�q=t-h�(k�t)/(k�p)=t+htant,������������������������������������������ (18)

fig. a4� a right-handed cartesian coordinate system tjp fixed to the base-plate
summary:
an excel spreadsheet is provided for the generation of alignment charts.� using an appropriate chart (as determined by season and latitude), the cooker can be aimed ahead of the sun, thus doubling the duration of unattended cooking.
reference
1. �parabolic reflector for unattended cooking,� by li-yan zhu and yun k. kim, a parabolic solar cooker for unattended cooking april, 2002